Using GRE Tunnels with Open vSwitch
2013-11-03
The post from http://blog.scottlowe.org/2013/05/07/using-gre-tunnels-with-open-vswitch/
I’m back with another “how to” article on Open vSwitch (OVS), this time taking a look at using GRE (Generic Routing Encapsulation) tunnels with OVS. OVS can use GRE tunnels between hosts as a way of encapsulating traffic and creating an overlay network. OpenStack Quantum can (and does) leverage this functionality, in fact, to help separate different “tenant networks” from one another. In this write-up, I’ll walk you through the process of configuring OVS to build a GRE tunnel to build an overlay network between two hypervisors running KVM.
Naturally, any sort of “how to” such as this always builds upon the work of others. In particular, I found a couple of Brent Salisbury’s articles (here and here) especially useful.
This process has 3 basic steps:
- Create an isolated bridge for VM connectivity.
- Create a GRE tunnel endpoint on each hypervisor.
- Add a GRE interface and establish the GRE tunnel. These steps assume that you’ve already installed OVS on your Linux distribution of choice. I haven’t explicitly done a write-up on this, but there are numerous posts from a variety of authors (in this regard, Google is your friend).
We’ll start with an overview of the topology, then we’ll jump into the specific configuration steps.
Reviewing the Topology
The graphic below shows the basic topology of what we have going on here:
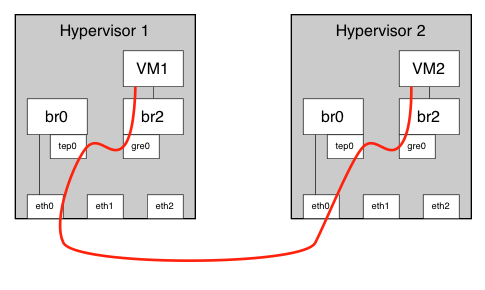
We have two hypervisors (CentOS 6.3 and KVM, in my case), both running OVS (an older version, version 1.7.1). Each hypervisor has one OVS bridge that has at least one physical interface associated with the bridge (shown as br0 connected to eth0 in the diagram). As part of this process, you’ll create the other internal interfaces (the tep and gre interfaces, as well as the second, isolated bridge to which VMs will connect. You’ll then create a GRE tunnel between the hypervisors and test VM-to-VM connectivity.
Creating an Isolated Bridge
The first step is to create the isolated OVS bridge to which the VMs will connect. I call this an “isolated bridge” because the bridge has no physical interfaces attached. (Side note: this idea of an isolated bridge is fairly common in OpenStack and NVP environments, where it’s usually called the integration bridge. The concept is the same.)
The command is very simple, actually:
#ovs-vsctl add-br br2
Yes, that’s it. Feel free to substitute a different name for br2 in the command above, if you like, but just make note of the name as you’ll need it later.
To make things easier for myself, once I’d created the isolated bridge I thencreated a libvirt network for it so that it was dead-easy to attach VMs to this new isolated bridge.
Configuring the GRE Tunnel Endpoint
The GRE tunnel endpoint is an interface on each hypervisor that will, as the name implies, serve as the endpoint for the GRE tunnel. My purpose in creating a separate GRE tunnel endpoint is to separate hypervisor management traffic from GRE traffic, thus allowing for an architecture that might leverage a separate management network (which is typically considered a recommended practice).
To create the GRE tunnel endpoint, I’m going to use the same technique I described in my post on running host management traffic through OVS. Specifically, we’ll create an internal interface and assign it an IP address.
To create the internal interface, use this command:
#ovs-vsctl add-port br0 tep0 -- set interface tep0 type=internal
In your environment, you’ll substitute br2 with the name of the isolated bridge you created earlier. You could also use a different name than tep0. Since this name is essentially for human consumption only, use what makes sense to you. Since this is a tunnel endpoint, tep0 made sense to me.
Once the internal interface is established, assign it with an IP address usingifconfig or ip, whichever you prefer. I’m still getting used to using ip (more on that in a future post, most likely), so I tend to use ifconfig, like this:
#ifconfig tep0 192.168.200.20 netmask 255.255.255.0
Obviously, you’ll want to use an IP addressing scheme that makes sense for your environment. One important note: don’t use the same subnet as you’ve assigned to other interfaces on the hypervisor, or else you can’t control that the GRE tunnel will originate (or terminate) on the interface you specify. This is because the Linux routing table on the hypervisor will control how the traffic is routed. (You could use source routing, a topic I plan to discuss in a future post, but that’s beyond the scope of this article.)
Repeat this process on the other hypervisor, and be sure to make note of the IP addresses assigned to the GRE tunnel endpoint on each hypervisor; you’ll need those addresses shortly. Once you’ve established the GRE tunnel endpoint on each hypervisor, test connectivity between the endpoints using ping or a similar tool. If connectivity is good, you’re clear to proceed; if not, you’ll need to resolve that before moving on.
Establishing the GRE Tunnel
By this point, you’ve created the isolated bridge, established the GRE tunnel endpoints, and tested connectivity between those endpoints. You’re now ready to establish the GRE tunnel.
Use this command to add a GRE interface to the isolated bridge on each hypervisor:
#ovs-vsctl add-port br2 gre0 -- set interface gre0 type=gre options:remote_ip=<GRE tunnel endpoint on other hypervisor>
Substitute the name of the isolated bridge you created earlier here for br2 and feel free to use something other than gre0 for the interface name. I think usinggre as the base name for the GRE interfaces makes sense, but run with what makes sense to you.
Once you repeat this command on both hypervisors, the GRE tunnel should be up and running. (Troubleshooting the GRE tunnel is one area where my knowledge is weak; anyone have any suggestions or commands that we can use here?)
Testing VM Connectivity
As part of this process, I spun up an Ubuntu 12.04 server image on each hypervisor (using virt-install as I outlined here), attached each VM to the isolated bridge created earlier on that hypervisor, and assigned each VM an IP address from an entirely different subnet than the physical network was using (in this case, 10.10.10.x).
Here’s the output of the route -n command on the Ubuntu guest, to show that it has no knowledge of the “external” IP subnet—it knows only about its own interfaces:
ubuntu:~ root$ route -n
Kernel IP routing table
Destination  Gateway       Genmask        Flags Metric Ref Use Iface
0.0.0.0      10.10.10.254  0.0.0.0        UG    100    0   0   eth0
10.10.10.0   0.0.0.0       255.255.255.0  U     0      0   0   eth0
Similarly, here’s the output of the route -n command on the CentOS host, showing that it has no knowledge of the guest’s IP subnet:
centos:~ root$ route -n
Kernel IP routing table
Destination  Gateway        Genmask        Flags Metric Ref Use Iface
192.168.2.0  0.0.0.0        255.255.255.0  U     0      0   0   tep0
192.168.1.0  0.0.0.0        255.255.255.0  U     0      0   0   mgmt0
0.0.0.0      192.168.1.254  0.0.0.0        UG    0      0   0   mgmt0
In my case, VM1 (named web01) was given 10.10.10.1; VM2 (named web02) was given 10.10.10.2. Once I went through the steps outlined above, I was able to successfully ping VM2 from VM1, as you can see in this screenshot:
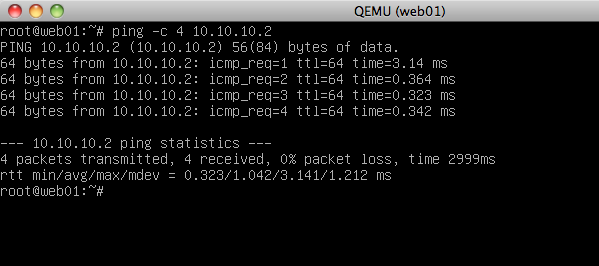
VM-to-VM connectivity over GRE tunnel
(Although it’s not shown here, connectivity from VM2 to VM1 was obviously successful as well.)
“OK, that’s cool, but why do I care?” you might ask.
In this particular context, it’s a bit of a science experiment. However, if you take a step back and begin to look at the bigger picture, then (hopefully) something starts to emerge:
- We can use an encapsulation protocol (GRE in this case, but it could have just as easily been STT or VXLAN) to isolate VM traffic from the physical network and from other VM traffic. (Think multi-tenancy.)
- While this process was manual, think about some sort of controller (an OpenFlow controller, perhaps?) that could help automate this process based on its knowledge of the VM topology.
- Using a virtualized router or virtualized firewall, I could easily provide connectivity into or out of this isolated (encapsulated) private network. (This is probably something I’ll experiment with later.)
- What if we wrapped some sort of orchestration framework around this, to help deploy VMs, create networks, add routers/firewalls automatically, all based on the customer’s needs? (OpenStack Networking, anyone?)
Anyway, I hope this is helpful to someone. As always, I welcome feedback and suggestions for improvement, so feel free to speak up in the comments below. Vendor disclosures, where appropriate, are greatly appreciated. Thanks!